 Hello Again Blog Buddies!
Welcome back to this weeks recipe.
After last weeks pork pie recipe we're staying on the traditional British vibe this week with a gorgeous classic pudding.
I can honestly say that I can't think of anyone I know who doesn't like treacle tart. It's one of those desserts that many will remember fondly from school dinners from years ago, or grandma making for Sunday tea time as a special treat. Its another one of those thrifty dishes that has stood the test of time because of its simplicity and, of course, its sweet, chewy deliciousness. It's hardly going to help with your weight-watchers diet, or your 5 and 2 diet, or your caveman diet, or whatever the newest innovation in denying yourself the simple pleasures in life is at the moment but if you're going to treat yourself then I always think you might as well properly treat yourself! I mean I watch what I eat and I go to the gym at least 3 times a week, so if I want to make such a naughty pudding then I will do, because I deserve it! Besides, I've always thought that if you spend time making such treats as this then you'll respect it more and won't be so tempted to eat the whole thing once it's made, and you'll be more likely to have people over to share it with which means you'll be enjoying food as it should be enjoyed, sitting round a table with a group of friends, chatting and laughing, which is actually a proven way of reducing how much you eat. Much better for you than sitting in front of the telly, eating "calorie controlled" diet meal slop from the microwave container, wheres the fun in that?
I've kept my treacle tart recipe fairly traditional, with just the addition of a little lemon zest in the pastry and a good squeeze of lemon juice in the filling, just to cut through the sweetness a little. I had a look through the various recipes on the Internet that added all kinds of stuff from ginger or apples (!) to black pepper to the tart, using different kinds of breadcrumbs, mixing golden syrup with black treacle and adding sugar to the pastry but I thought sometimes, traditional is best! ( I quite fancied trying a bit of black pepper actually, but I thought no, lets keep it simple.)
I've made my own pastry for this recipe and I urge you to do so too. I'm not the best pastry chef in the world as I have what is known as "bread hands". That is, I have big, warm hands more suitable to pulverising and kneading to get a good stretchy bread dough than pastry which requires cool hands and a lightness of touch to achieve a short, crumbly, light pastry. There are a few simple tips to help anyone also afflicted by "bread hands" that I've been shown on the way through my cheffing career which I'll share with you now:
1: Make sure everything you are using is cold. The butter, the flour and the water can all be weighed or measured out and put in the fridge before you start, even the mixing bowl, spoon and rolling pin!
2: Your kitchen should be cool too, so open a window or door and don't turn the oven on until just before you need it. ( In one restaurant kitchen I worked in in London the pastry chef used to make all of his in the walk-in fridge to ensure he got the best pastry possible!)
3: Don't overwork your pastry. You only need to do just enough to it so that it can be rolled out to form the case for the tart, you don't need to knead it to get it smooth as this will melt the fat and release the gluten from the flour and you'll end up with a chewy, hard,shrunken case. If you feel that you have overworked it stick it back in the fridge for 10 minutes to relax, then carry on.
4: Use your freezer. When you have got your case in the baking tin, give it a good 15 minutes in the freezer to firm up. It doesn't matter if it is completely frozen when you come to blind bake it, although it may take a little longer to bake.
5: Keep an eye on the pastry while it is blind baking, with any pastry the quantities used are crucial, but normal household ovens can be wildly inaccurate when it comes to temperature so the timings I've given in the recipe are really just a guide.You don't really want the pastry to take on any colour when blind baking but it needs to be cooked through so the filling doesn't leak into it when you are ready to finish the tart.
Right then, enough rules! lets get on with the recipe.
Treacle Tart (makes 8-10 portions.)
Equipment: (for the pastry.)
Kitchen scales.Rolling pin.
Mixing bowl.
Metal tablespoon.
26cm loose bottomed baking tin.
2 pieces of greaseproof paper, large enough to more than cover the baking tin.
Marble pastry board, if you have one.
2 handfuls of uncooked rice, or baking beans, or loose change to weigh down the greaseproof paper whilst blind baking.
Pastry brush.
 Ingredients:
300g plain flour.150g of butter, diced evenly and chilled.
3-4 tablespoons of ice cold water.
Zest of half a lemon.
Half a teaspoon of salt.
1 egg, beaten.
Extra butter for greasing the tin.
A little extra flour for flouring the tin and rolling out the pastry.
Method:

 Lightly grease the baking tin with butter and then add a little flour, shake the tin round to coat the butter with flour, tip out any excess flour and put the tin in the freezer.
Put the flour, lemon zest and salt in a mixing bowl and add the chilled butter dice. Using just your fingertips rub the butter into the flour until it looks like fine breadcrumbs.
 Add 3 tablespoons of water and gently mix it in with the metal tablespoon.
Gently press together the dough to form a ball, if it is too crumbly add another tablespoon of water.
Flatten the pastry out into a thick disk, and pop into the fridge for 10 minutes.

Put one of the sheets of greaseproof paper on the marble pastry board, or your work surface and lightly flour it.
Put your pastry on top of the floured greaseproof and lightly flour the top of the dough.


Make sure the dough is rolled out enough to fill the baking tin with a bit extra all the way round.
Then, put the tin upside down on the pastry and slide the bottom sheet of greaseproof off the work surface and turn over so the pastry is now sitting in the tin. ( Unfortunately I only have one pair of hands so couldn't take a picture of me doing this step!)
 Gently lift the overhang up and push the pastry into the sides of
the tin all the way round.
If there is a lot of overhanging pastry left then trim it down around the outside edge of the tin.

Now, take a good look at the pastry, if you see any cracks or tears then patch them up with a bit of the trimmings.

Then prick the bottom of the dough with a sharp knife and pop the whole thing, uncovered in the freezer while you get on with making the filling.
Treacle Tart Filling:
Equipment:
Food processor.Large saucepan.
Balloon whisk.
Ingredients:
60g of butter.
450g of Golden Syrup. ( as you can see, I've got a lot of golden syrup! but 1 regular tin will be enough.)
2 tablespoons of double cream.
1 whole egg.
1 egg yolk.
2 tablespoons of lemon juice.
160g of fresh brown breadcrumbs, made from about 7 slices of bread, crusts removed.
A good pinch of salt.(optional)
Method:
 Blitz the brown bread slices in the food processor to make the breadcrumbs.
Melt the butter in the saucepan over a medium heat and whisk in the golden syrup. If you are using a tin of the golden syrup then stand it in a bowl of hot water before you start to make it runny and easier to use.
 Add the cream to the pan and whisk in, then remove from the heat and whisk in the whole egg and the extra yolk.
Finally, add the breadcrumbs, the lemon juice and a good pinch of salt (if using) and stir to combine.
Now to blind bake the pastry case!

Heat the oven to 180 degrees c/ gas mark 4.
Remove the pastry case from the freezer.
Scrunch up one of the pieces of greaseproof paper you used before to roll out the pastry and line the inside of the pastry case with it.
Fill the greaseproof with the rice, baking beans or whatever you are using to weigh it down and spread out evenly across the paper, making sure it gets right into the edge of the pastry.
Put the whole thing in the oven on a low shelf and bake for 15-20 minutes, until the pastry is cooked through. To test for this, you can remove it from the oven and press the centre of the pastry through the greaseproof, if it still feels soft then give it another 5 minutes in the oven.
 Once you are happy that the case is baked then remove the greaseproof and rice and put back in the oven for a five minutes just to dry out the bottom of the pastry where the greaseproof has been.
 After 5 minutes, remove from the oven and give it a good egg wash all over the bottom and sides and pop back in the oven for another 5 minutes.
As you can see from the photo the case hasn't shrunk at all, which means all the hard work making the dough has paid off and means you have a great, short, crumbly pastry!
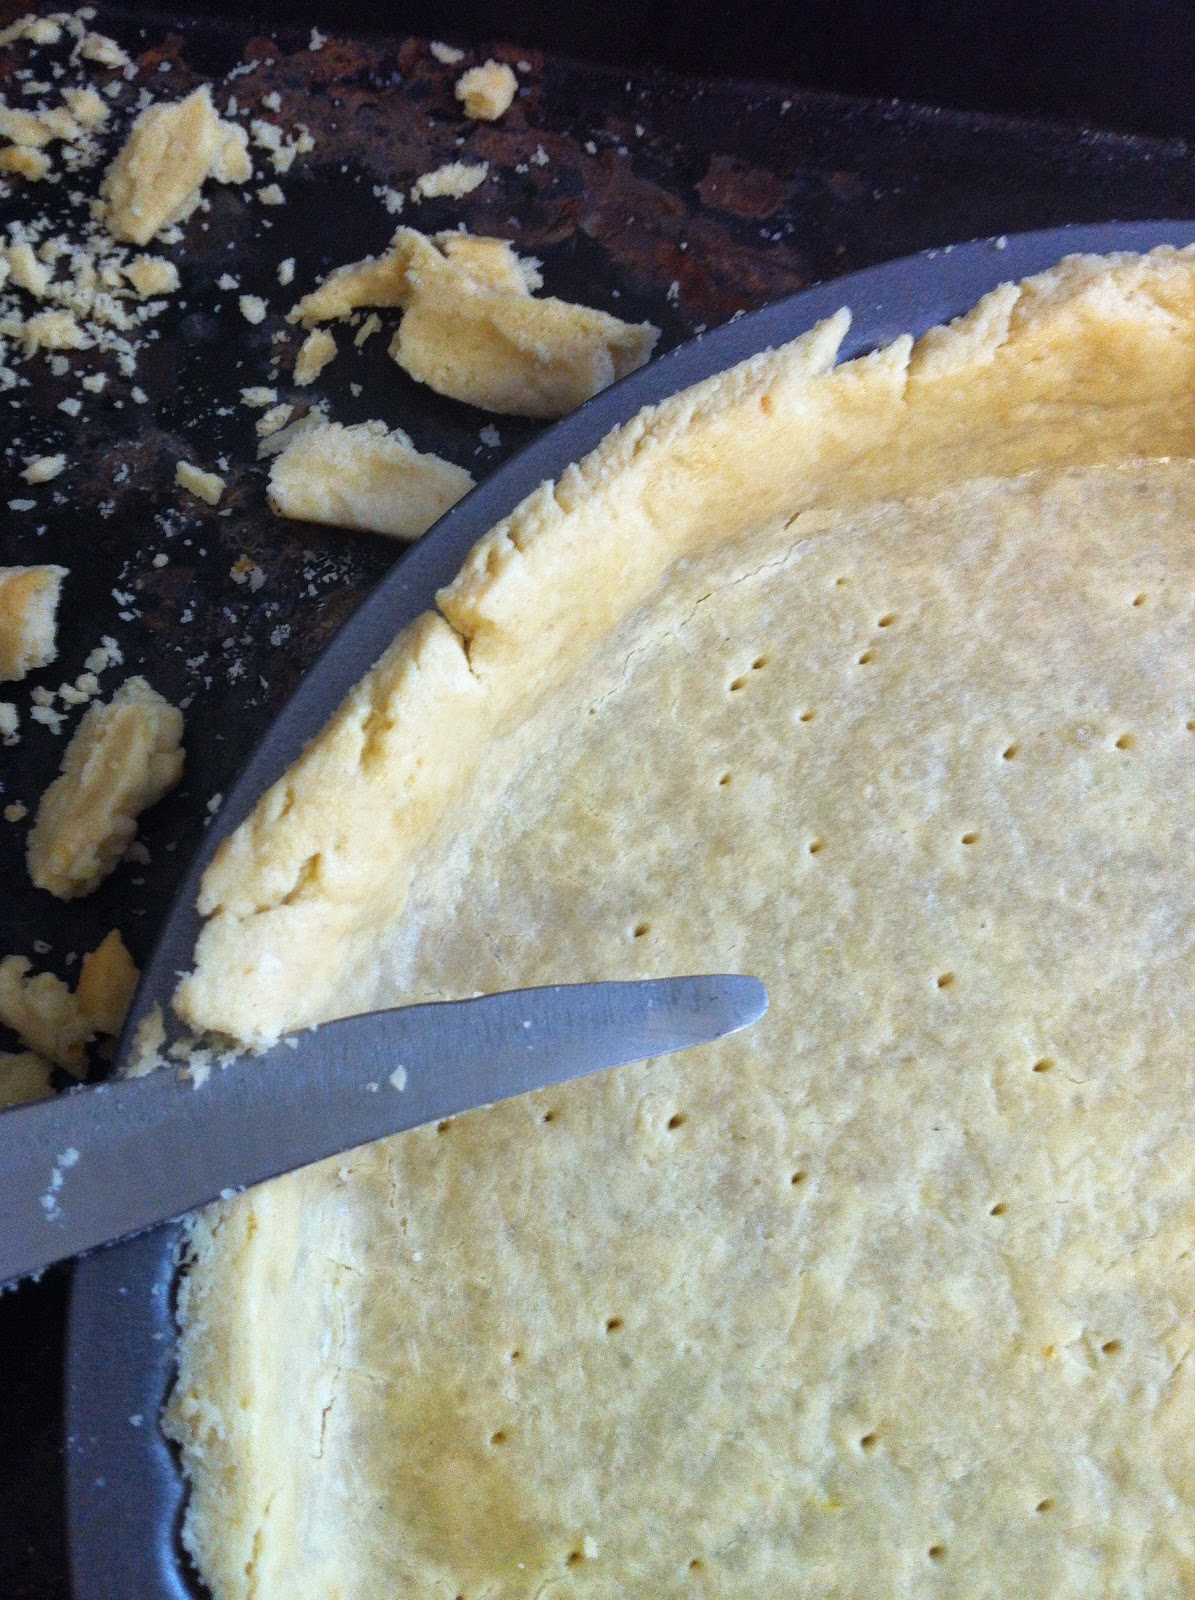 When the egg washed pastry has had its 5 minutes remove from the oven and allow to cool for a few minutes, then trim off the excess pastry from the top to leave a nice clean edge.

The centre of the filling should still be a little loose and "jiggly" when you take it out as this will continue to cook and set just perfectly as it cools.
When cooled remove the outer ring of the tin by putting a glass or food tin under the centre of the loose bottom and the outer ring should just drop down out of the way.


And there it is! truly rich, slightly chewy on top and sweet with a lovely crisp, crumbly,buttery pastry. Invite some friends round to share it with them and just watch the excess weight fall off!!
Thanks again for having a look at my blog, I'm off out tonight ( Wednesday 30th July.)to a "soft opening" of a very swish looking new restaurant in Birmingham. As promised, I will be doing a review over the next couple of days so keep your eyes peeled for it!
Until next time then, foodie friends,


